Remote Flight Deck Overview
Published: Updated:
Remote Flight Deck (RFD) is Skydio’s browser-based flight interface that allows Remote Pilots to operate Skydio X10 from a remote location. It brings live video, map context, telemetry, and flight controls together in a single interface to support situational awareness during remote operations.
[note] The following updates are coming soon with the Cayley Release. [/note]
Overview and Layout
Remote Flight Deck is organized around four core areas that remain visible throughout flight:
- Video view for live visual monitoring and subject tracking
- Map view for spatial context and navigation
- Telemetry indicators for flight/connection health and status
- Actions and settings for inflight control and adjustments
Other features include:
| Full manual flight controls | ADS-B air traffic alerts |
| Automated flight behaviors like Return, Fly Here Now, and Custom Markers | Dock and drone Weather Sensor alerts |
| Map tools to help maximize situational awareness | Photo, Video, and Thermal tools |
| The ability to share ReadyLinks | Flight and connection health monitoring |
| Real-time telemetry | Critical inflight settings (e.g., return behavior, height ceiling) |
| 2D and 3D Map Views | Flight around Geofences created on the Dock and Remote Operations Site |
| AR tools such as Street Overlay | Heads up Display including crosshairs, airspeed, altitude, heading, and more |
[note] Various images in this guide leverage simulated environments from Skydio Paraverse. Visuals and workflows are representative of operational use of Skydio Remote Flight Deck, but may include rendered environments. [/note]
Navigating Remote Flight Deck
The Action Bar provides quick access to inflight tools and controls such as settings, ReadyLink sharing, attachments, and subject tracking. Actions are designed to remain accessible while maintaining focus on live video, map context, and telemetry.
The Settings menu is accessible both while grounded or during flight. Use this menu to configure the inflight drone settings, including Return and Lost Connection behaviors. Organization-level defaults apply automatically, while inflight adjustments may be made where permitted.
RFD Settings menu
Select and drag the center divider line to adjust the size of the Map View and Video Feed.
The Map View displays a wide range of critical information. Here you can manually create Custom Markers or Incidents, initiate a Fly Here Now mission, set a Home Point, or instantly copy the GPS coordinates of a location. All active flight systems in the organization are displayed in this view, along with the Pilot initials, drone name, AGL, and battery level.
Active Flight Systems | Map Tools |
Photo and video settings are easily accessible by expanding the Camera button in the bottom right corner.
Telemetry indicators provide continuous insight into flight status and system health during operations. For a more streamlined view, enable Simplified telemetry bar within the Display settings. Key telemetry information includes:
- Altitude, such as height above launch and above ground level
- Speed and heading
- Battery status, including available flight time and return reserves
- Navigation health, including GPS and visual navigation status
- Connection health between the drone, Dock, and browser
Remote Flight Deck Interface
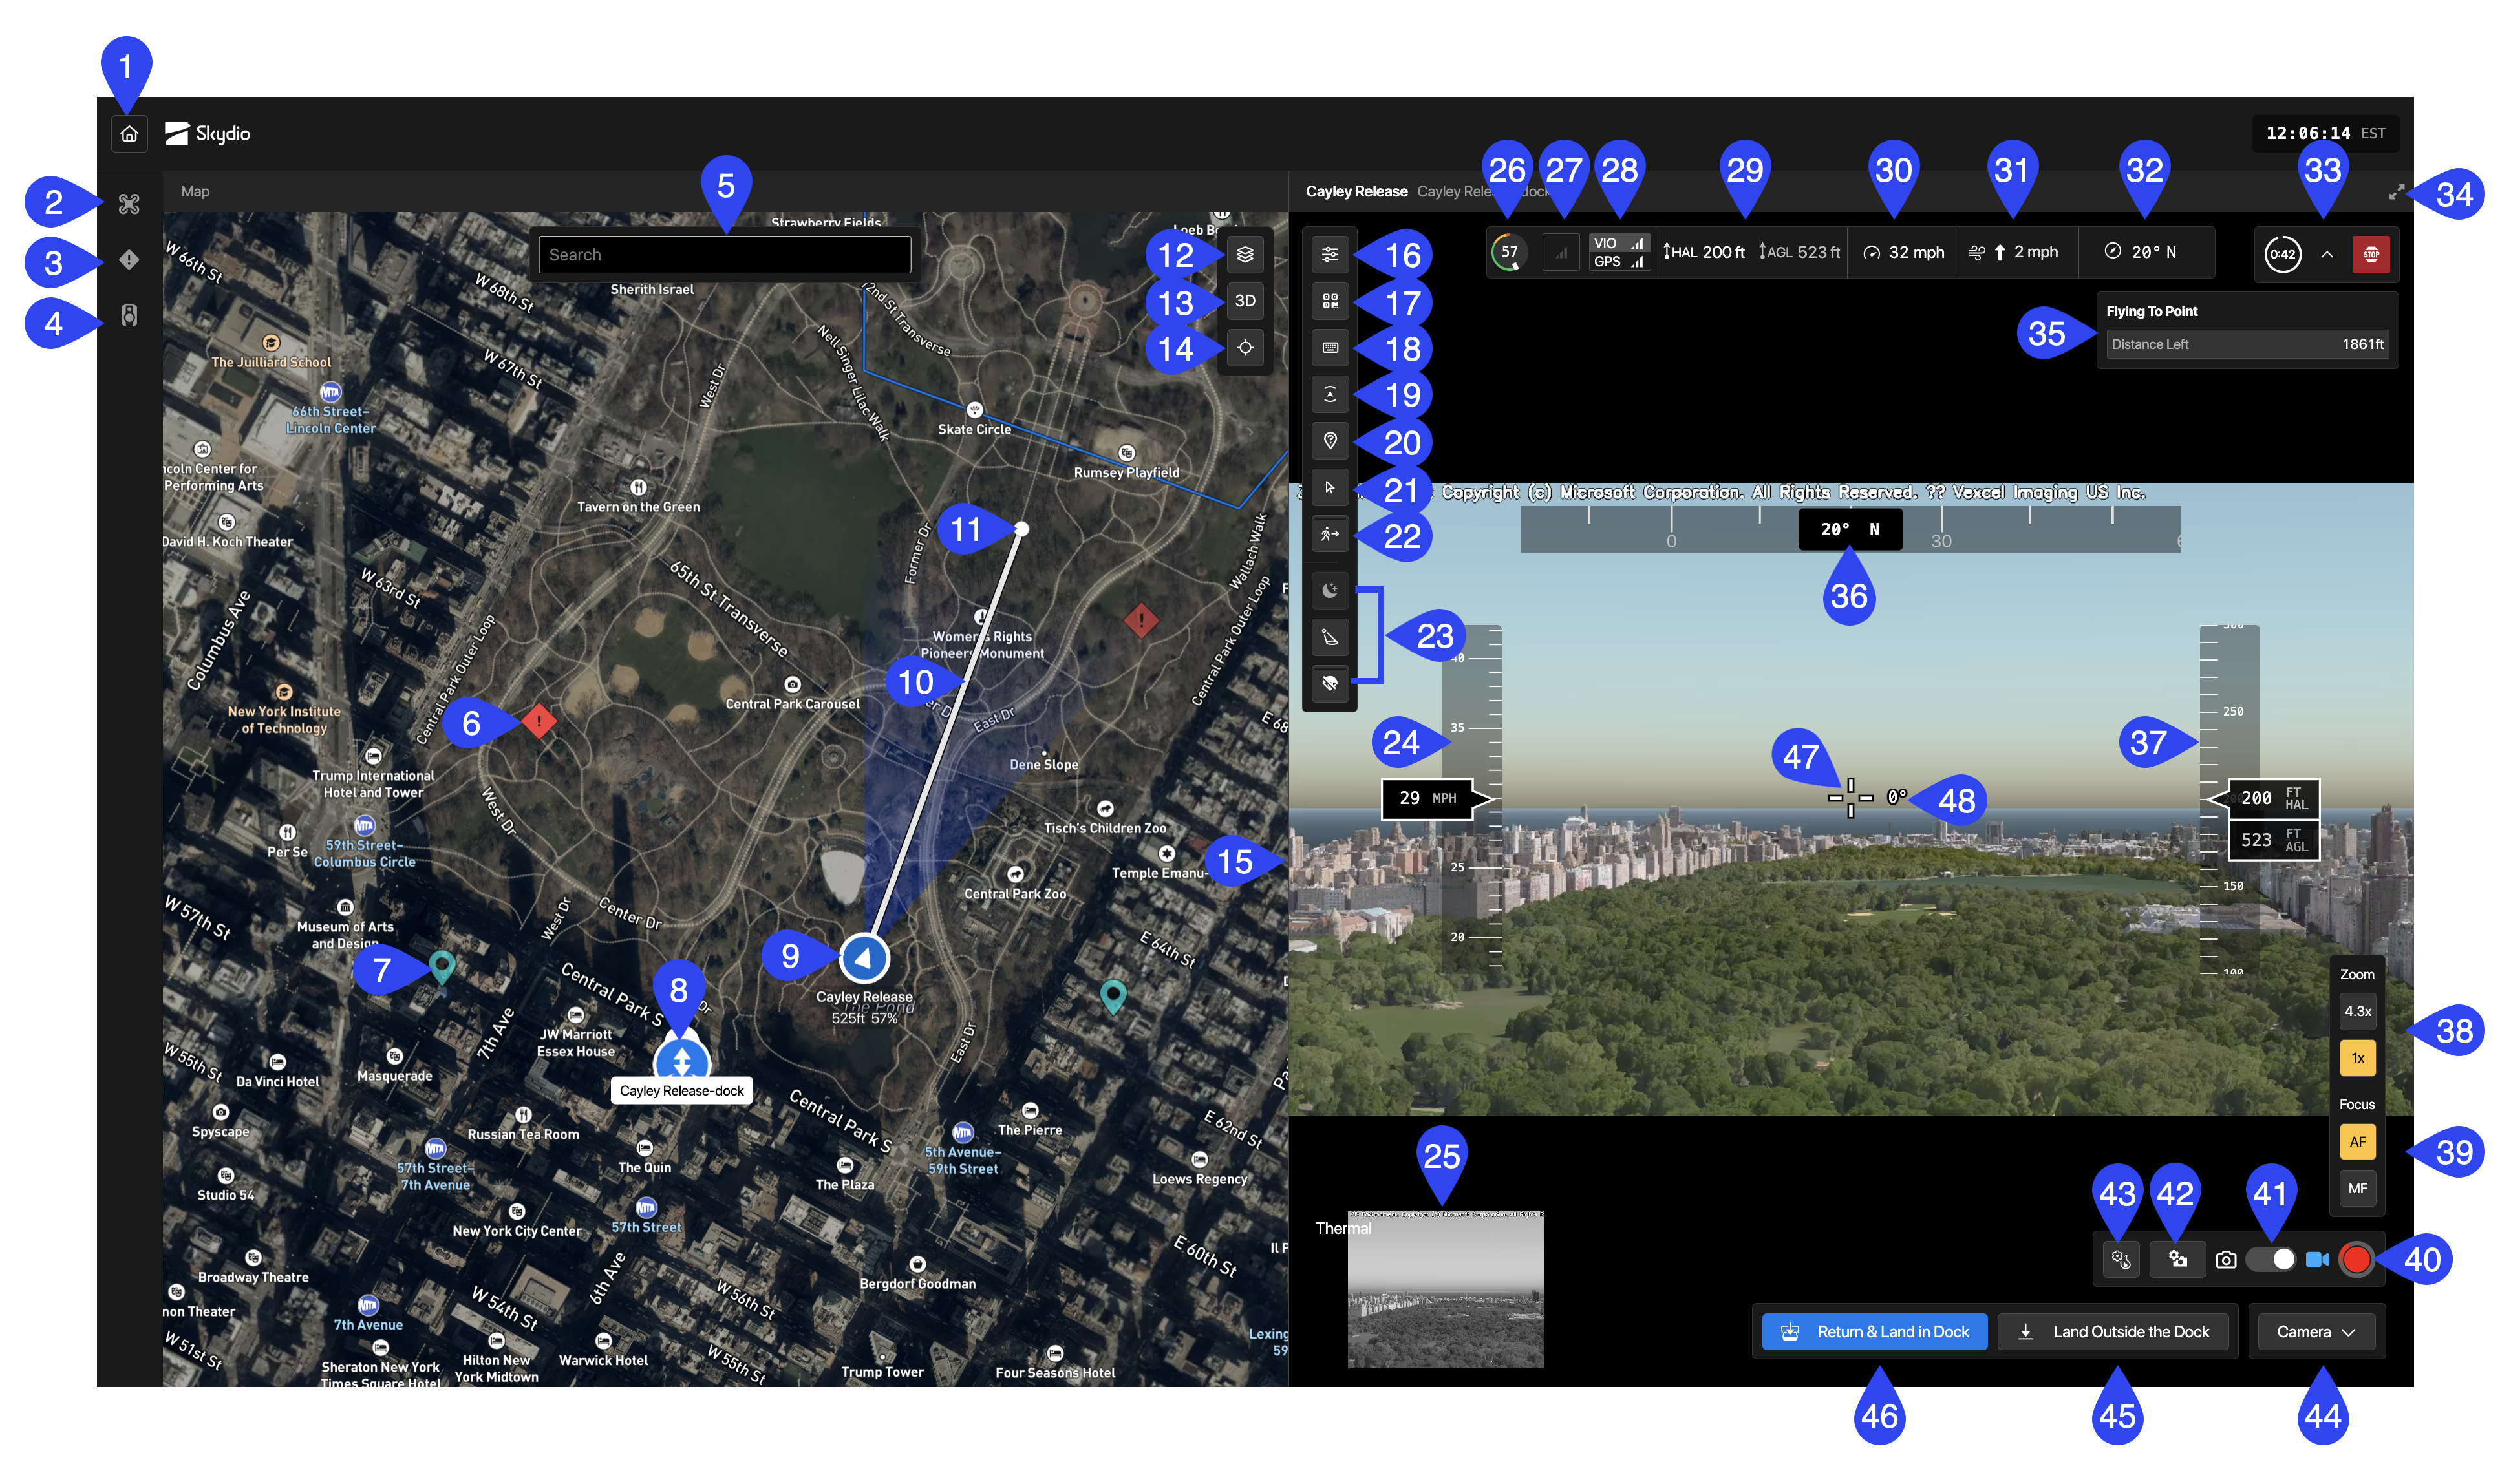
- Return to Skydio Cloud (exit Remote Flight Deck)
- Information Panel - Devices
- Information Panel - Incidents
- Information Panel - Personnel
- Map Search (address/location)
- Incident Marker
- Custom Marker
- Dock/Launch Location
- Drone location and orientation
- Flight Path
- Fly Here Now location
- Map Layers
- 2D/3D Map View
- Lock view to drone (center)
- Drag to resize the map or video feed
- RFD Settings
- Share ReadyLink
- View Controls (`)
- Configure Obstacle Margins (R)
- View/Hide Crosshair Ground Point Information
- Enter Pointer Lock (C)
- Enable/Disable Shadow Subject Track or Follow
- Attachment Quick Actions
- Heads-Up Display (HUD): Airspeed
- Picture-in-Picture (PiP) and Color/Thermal Stream Selector
- Battery Level
- Connection Health
- Positioning System Health Indicator
- Telemetry: Height Above Launch (HAL) and Height Above Ground Level (AGL)
- Vehicle Speed
- Wind Speed and Direction Relative to Vehicle
- Heading Angle
- Time to Destination and Stop Autonomous Flight
- Maximize/Minimize View (video feed)
- Autonomous Mission Summary (e.g., Fly Here Now)
- Heads-Up Display (HUD): Compass
- Heads up Display: Altitude (HAL/AGL/MSL)
- Zoom Controls
- Focus Controls (AutoFocus or Manual Focus)
- Shutter/Record
- Video Mode/Photo Mode
- Video/Photo Settings
- Thermal Settings
- Toggle Camera Settings
- Land Outside the Dock
- Return and Land in Dock
- Crosshair
- Gimbal Angle
Map View
The Map View provides a real-time spatial representation of the drone and its surroundings to complement the video feed. Use this view for general situational awareness and autonomous actions such as Fly Here Now commands.
The map view shows:
- Drone position, heading, and movement
- Approximate camera field of view
- Fly Here Now points, custom markers, and flight paths
- Keep-In and Keep-Out geofences (when configured)
Operators can switch between 2D and 3D map views and reorient the map as needed while continuing to monitor live video and telemetry.
2D Map View | 3D Map View |
Use the map to annotate points of interest or actively fly to a location:
- Fly Here is used when directing the drone to a specific point; only appears when you right-click on the map, and will always fly the drone right to that location
- Respond Here is used when navigating to an Incident marker; the drone will use the Standoff Distance set by the Remote Pilot, as well as the option to Look at the Marker while responding (if a Standoff Distance is not set, the drone will fly directly to the marker)
Use the icons on the left side to view incidents and devices:
- Devices - Lists all available drones
- Incidents - Lists all custom markers and reported incidents via the integrated CAD system. Select an incident to view more details and optionally respond.
- Personnel - Lists active devices including body cameras and vehicles (e.g. Axon body cameras via Axon integration). Select a device in this tab or on the map to locate it and optionally respond. Only visible if you have an integration in place.
Skydio Inc., A0621
Was this article helpful?